I recently acquired a 48mm light pollution suppression (LPS) filter from Hutech. I was impressed by the results that I saw on their web site for use with CCD cameras, and I wanted to try it out for myself.
Last night, I was imaging to the NE and was having problems with glow from streetlights and homes in that direction. Normally the E is my best direction for imaging, but on some nights there is a light source to the NE that interferes with imaging. It shows up as increased sky glow, and is usually a gradient in the green channel of my color images. The light pollution was mild, not severe; I will do a test under severe conditions at some point (south or west from my location). Since I am more concerned with minor light pollution in my better imaging areas, where I do most of my imaging, that was what I wanted to know about first.
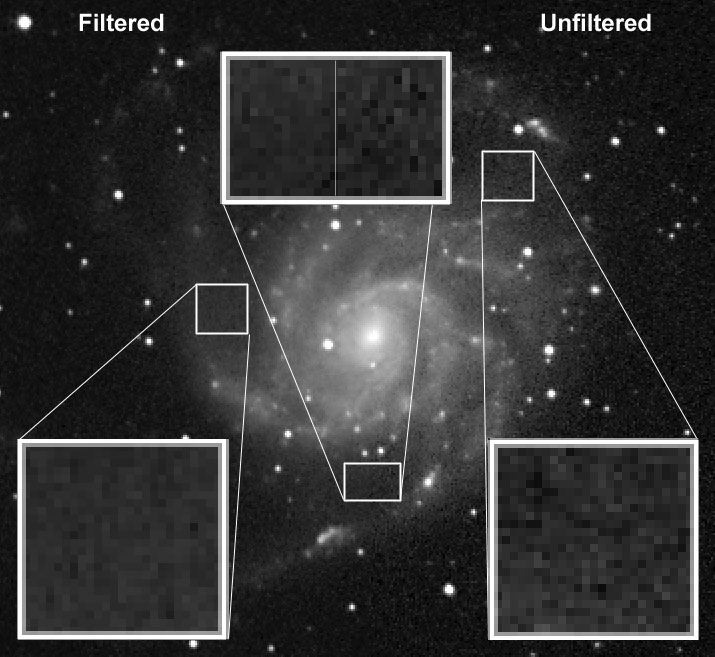
For the test, I took two sets of three luminance images (using the clear, non-IR blocking filter in the SBIG CFW-8) with and without the filter. I median combined each group of three. Each exposure was ten minutes long. The attached image shows the results. The left half of the image is from the filtered data; the right half unfiltered. Both images were processed to show just about exactly the same level of contrast, right about at where I would do it if I were looking to show as much detail as possible in the faint areas of the image. Other than histogram changes, no other processing (sharpening, smoothing, digital development, etc.) was done on these images.
The filtered image has consistently less noise everywhere you look. There are several comparisons enlarged to show this. The top insert straddles the line between the two images, and shows that the left (filtered) side is smoother in the dim area of the galaxy. The inserts at bottom left and bottom right show noise levels for two areas of comparable brightness; the filtered image is smoother (less noise). Just looking at the background image, it's pretty clear that the S/N ratio is better for the filtered image.
Conclusion: the LPS filter is excellent at reducing noise when light pollution is mild to medium. I did not test under heavy light pollution. There is a small cost to pay in terms of slightly longer exposures to get the same level of detail. I estimate that increasing your exposure time by 10% will give you about the same level of detail, and an even better S/N ratio. Your exact results will vary depending on the sources of light pollution in your area, since the LPS cannot cut broadband pollution, and does not cut all known forms of narrowband pollution.
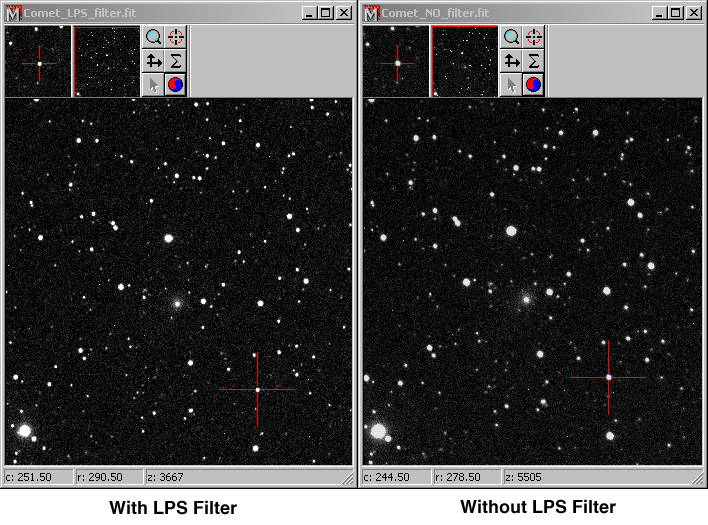
Note: If you are currently imaging without using an IR (infrared) blocking filter, the LPS filter blocks IR, and require you to double your exposure time. With refractors, this can actually be a real plus. Blocking IR in luminance images, for example, will often lead to sharper images because most refractors, even very high-end ones, don't bring the IR to a good focus. The image below shows the same area of the sky with and without the LPS filter. Both images were very carefully focused, and were taken of the same are of the sky within a few minutes of each other. The image on the left uses the LPS filter, and has smaller, tighter stars. There is a small amount of field rotation between the images because the camera was removed from the telescope to change the filter, and I didn't get it back in at the exact same angle of rotation.
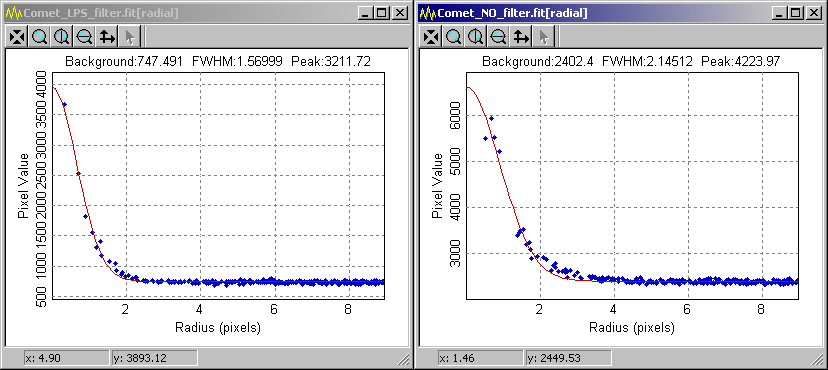
In addition to smaller, tighter stars, a measurement of the image backgrounds clearly illustrates the difference between using and not using the filter. The images above have been adjusted to show the same level of black background, but the actual backgrounds were quite different. The following table shows the background levels, peak brightness of the star under the crosshairs in the image images, FWHM, and the ratio of the star's peak brightness to the background brightness. A higher brightness ratio indicates better contrast.
| Background | Peak Brightness | Star FWHM | Brightness Ratio | |
| With LPS filter | 735 | 3,211 | 1.57 | 4.37 |
| NO LPS filter | 2,412 | 4,224 | 2.15 | 1.75 |
The numbers show why using the LPS filter provides better quality images. With the filter, stars are smaller/tighter, and have much better contrast. Without the filter, stars are fatter and have much less contrast with respect to the background. The same improvements in contrast happen for galaxies and nebulae, allowing you to record faint details more effectively. This results in better S/N in the image, and good S/N is what yields good, clear detail in your images. The following table includes some additional calculations from Magnus Nyborg which provide a better look at the relative value for the filtered and unfiltered cases using the Brightness Ratio (higher for LPS filtered image):
| Background (B) | Peak Brightness (P) | Star FWHM (h) | Total Brightness (I = P*h^2) |
Brightness Ratio (I / B) | |
| With LPS filter | 735 | 3,211 | 1.57 | 7,915 | 10.77 |
| NO LPS filter | 2,412 | 4,224 | 2.15 | 9,090 | 3.77 |
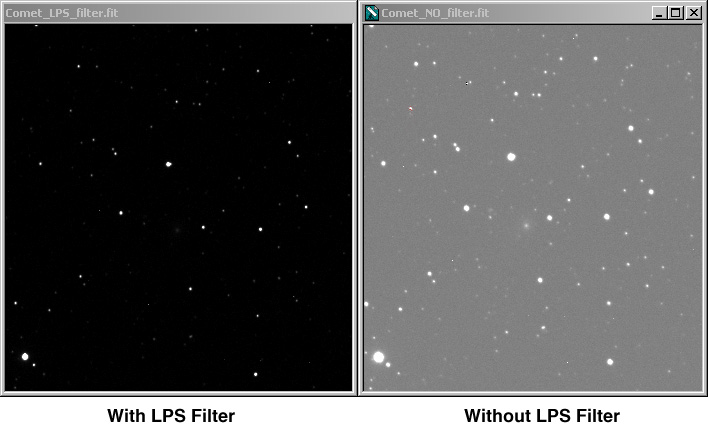
The following images show how the filtered and unfiltered images compare when they have identical minimum and maximum settings. The filtered image, on the left, shows pinpoint stars and a dark background. The right image (unfiltered) has a much brighter background and the stars are bloated by comparison. Both images have a black point set at 700 and a white point set at 4000. In actual use, of course, you would set appropriate black and white points to get the most out of each image.
he following graphs show that the slope of the light energy is much steeper when the LPS filter is used. This shows clearly that the light energy is more concentrated, leading to the brighter image and the improved contrast. This improvement comes from blocking IR energy when imaging with a refractor. There wouldn't be a benefit from blocking IR for telescopes that do not have chromatic problems, and I have asked the folks at Hutech to consider offering a version of the LPS filter that does not block IR.
The star images above weren't taken with any slouch refractor, by the way. These were taken with my Takahashi FSQ-106, which is the finest refractor I've ever used in terms of small, tight stars. Even such a great refractor doesn't quite hit perfection in infrared energy, so you should expect improvements with almost any refractor you try this with. By the way, can you spot the comet in the comparison images? It's McNaught-Hartley, a recent visitor to the inner solar system. You can see a slight movement from one image to the next.
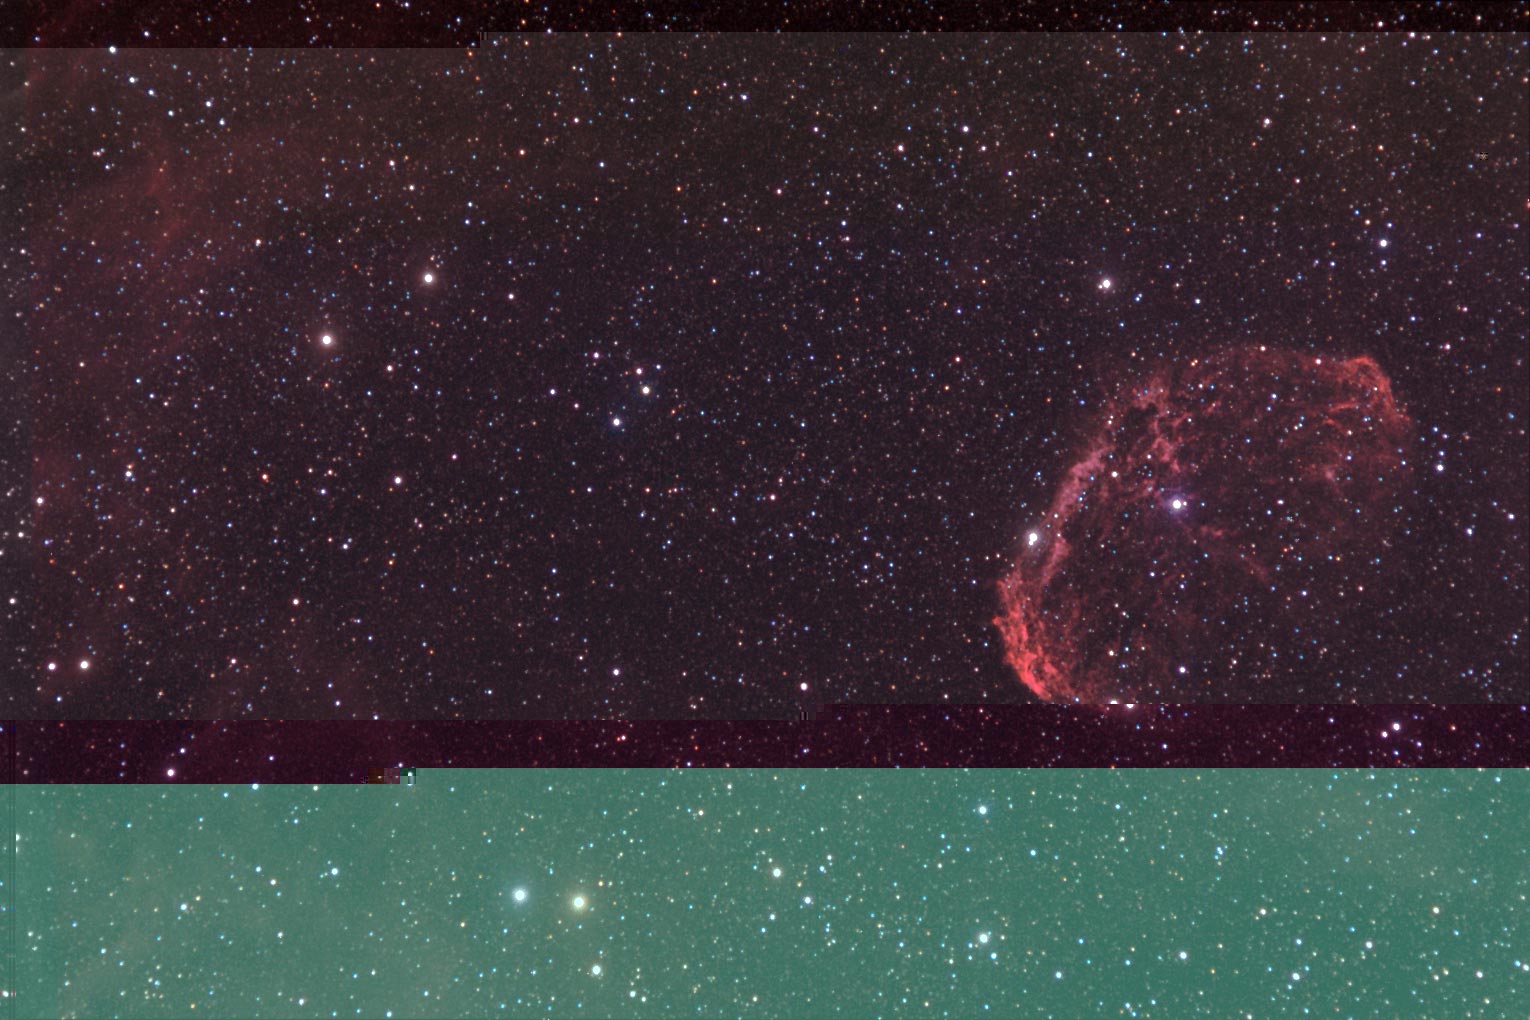
Finally, here is an image of the Crescent nebula, taken from my light-polluted backyard using the LPS filter. It shows how effective the LPS is when taking an image of an object with dim nebulosity. This is a crop of the area immediately around the nebula; for a full-size version of the complete ST-8E image, click on the image below. The image was taken with an Astro-Physics 130mm triplet refractor. This image shows that you can get very dim details well-resolved using the LPS filter, even from a light polluted location. Prior to using the LPS, I was frustrated by being unable to get first-rate images of dim objects from my backyard. The image is a sum of two 30-minute exposures through a red filter and the LPS filter for the luminance, and RGB exposures of 30:30:48 minutes for the color. The color images were taken with the FSQ-106 and scaled up to fit the AP 130 images. The color images were taken with Hutech's LRGB filter set, which have also provided me with first-rate results. I have an image of the Veil Nebula taken with the Hutech color filters that I also like very much.
.
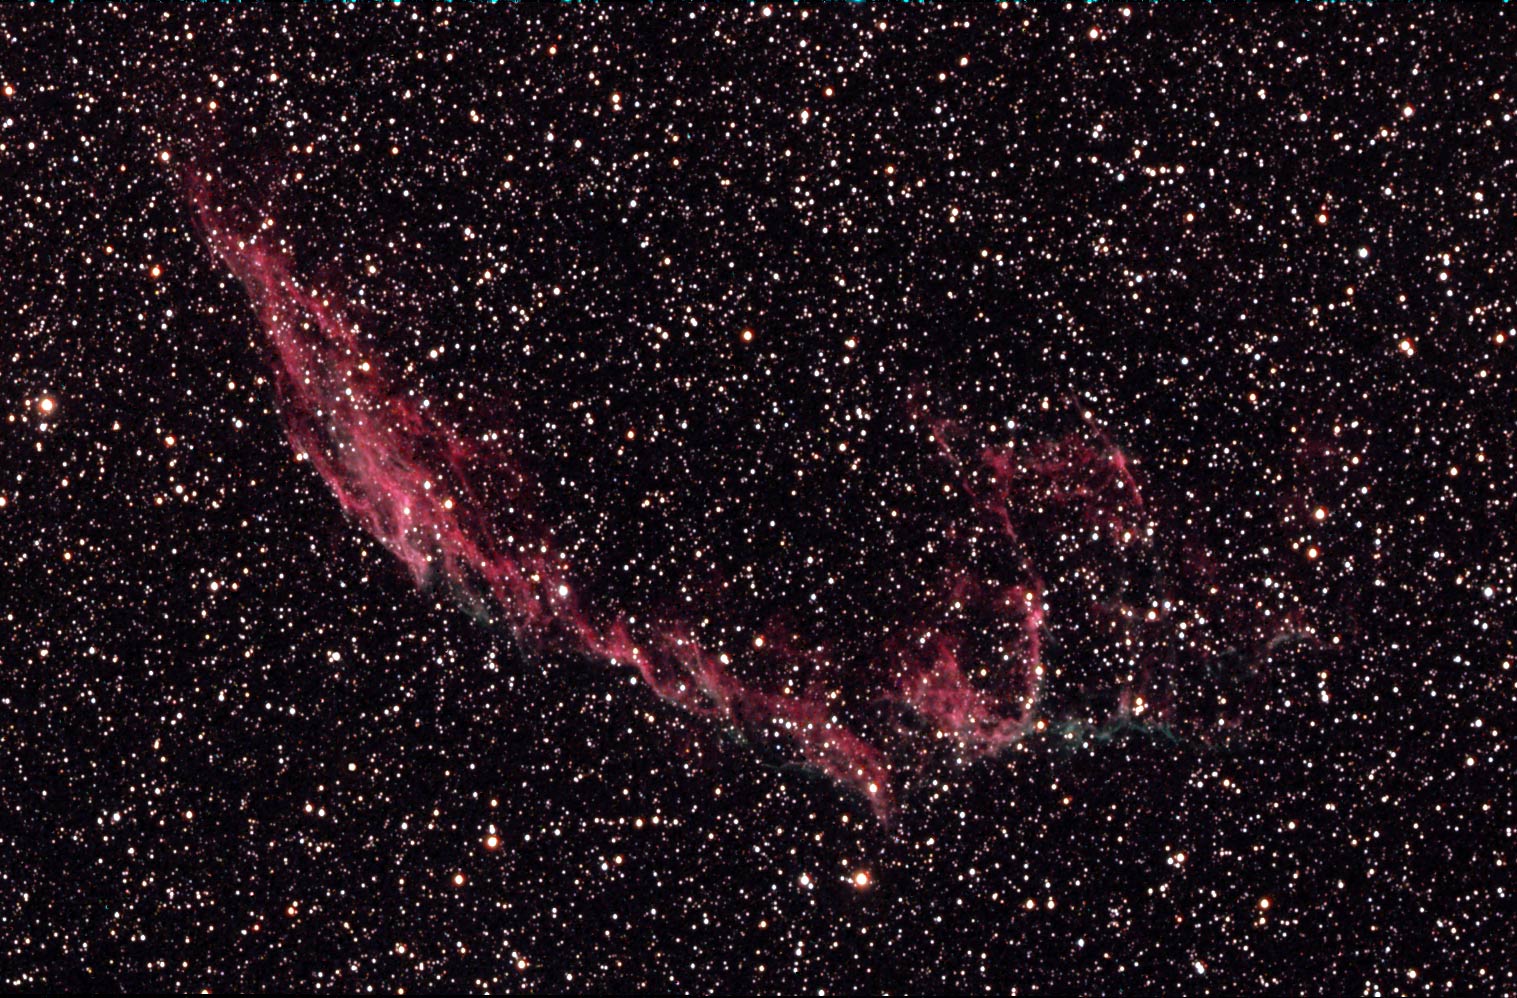
My best previous image of the Crescent Nebula, taken
without any light pollution filter, can be found
here. For more information on the filters, check out this page
on the Hutech web site: