Correcting a linear gradient in an image
Note: This is a preliminary document -- it's really just my initial notes after having developed this idea into an actual process. I will write up more complete documentation, with picture, in the near futre.
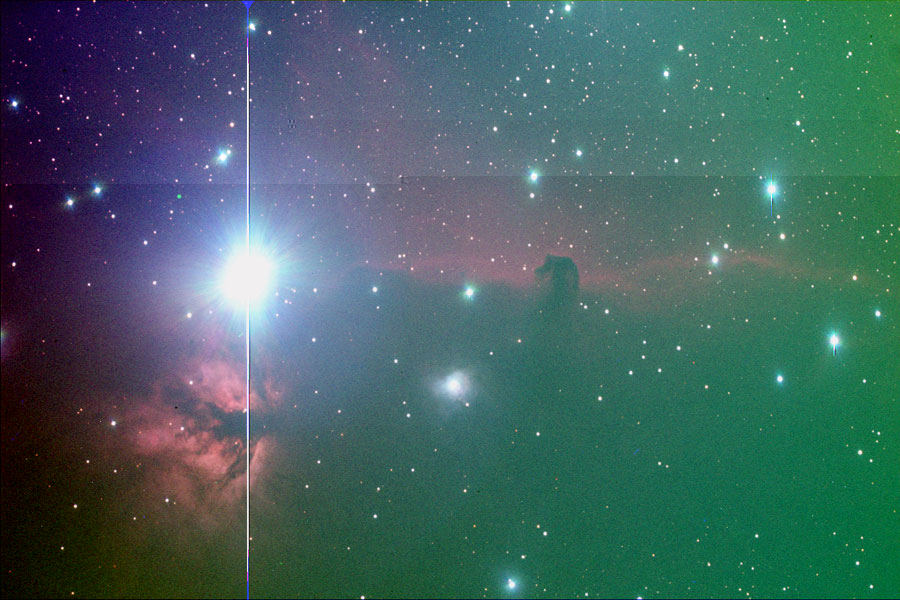
Here's an example of an image that has a good signal-to-noise ratio, but is plagued by a severe light-pollution gradient:
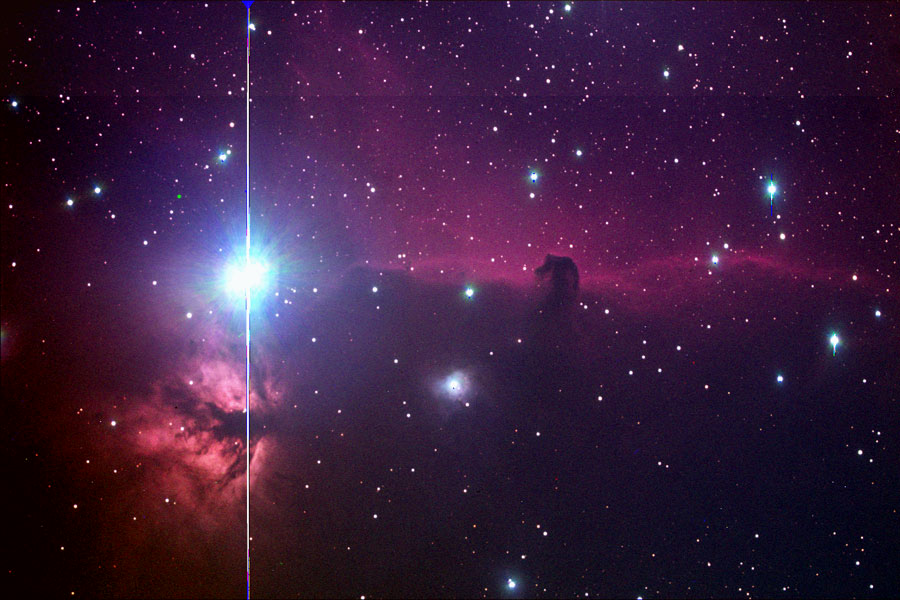
Here's what the iamge looks like after applying the technique described on this page to the green layer image:
Sometimes, despite a good dark frame and flat field, your image will still have a gradient in it. This is often due to some form of light pollution or sky glow that varies with distance from the source (moon, a nearby streetlight, a distant city, etc.). Since we often take a flat field using some completely different background (T-shirt, cardboard, ceiling, fence, wall, twilit sky, etc.), any linear gradient in the original data will be preserved after application of a dark frame and a flat field.
To correct such a gradient problem, you need to subtract a gradient at exactly matches the gradient in the image, less about 50 units to allow a little background so that the background is not totally black.
Subtracting such a gradient is easy; creating one is a little complicated. I worked out a technique described here that let's you create the exact right gradient using Photoshop and Maxim DL. Other software might make it a little easier, but I don't know about that other software so I can't tell you! And it looks and sounds much harder than it actually is; once I worked out the formulas and the process, it now takes just a couple of minutes to create the gradient I need.
NOTE: If you own Mira, it includes a command that will calculate the gradient and create a new file that contains the correct gradient for the subtraction. Or it can calculate the gradient correction and apply it via subtraction in a single step. This procedure is for everyone else.
NOTE: Maxim DL does have a Flatten Background command on the Process menu, but it doesn't handle some situations involving linear gradients. For example, an image with a galaxy covering the central third of the field will confuse this feature, leading to bands of lightness and darkness that do nothing to solve the problem.
Photoshop steps:
- Measure brightest portion of gradient in background and make a note of the value (e.g., upper left at 2168)
- Measure dimmest portion of gradient at opposite side and make a note of the value (e.g., lower right at 2056)
- Create a blank image of same size as your CCD images in Photoshop, either RGB or Grayscale.
- Make Black and White the current colors, with White the foreground color.
- Select the Gradient tool.
- Create a gradient by stretching the gradient tool's line from the point in the new image that corresponds to your brightest reading in step 1, to the point that corresponds to the dimmest reading in step 1.
- Convert this image to 16-bit (Image | Mode | 16 bits per channel)
- Save the file to disk.
Since the ideal target value for the background is around 50 units, we want to create a gradient that has a 16-bit value of 2118 at upper left, and 2006 at lower right. There is a net change of 112 units between the two positions. Since Photoshop can't create such a gradient in 16-bit mode, here is how to use the gradient you created in Photoshop to create the exact correct gradient in Maxim DL.
Maxim DL steps:
- Open the file. You will note that it has a value of about 65,000 at the brightest point, and 0 at the dimmest point.
- Perform pixel math (Process | Pixel Math) to scale the brighter value down near the , using the following settings:
- Image A is set to the file you just opened
- Scale factor should be set to a number that will give you a value that is approximately 50% greater than the brightest value from Photoshop step 1. For a value of 2168, 5% works just fine (5% of 65000 is 3000).
- Operation should be set to none; there is no other file.
- Image B will be grayed out after step C above.
- Add constant must be set to zero.
- Click OK
- You now have a gradient that goes from approximately 3000 (I got 3276 is my first attempt at this) at upper left to 0 at bottom right. The next step is to use pixel math two more times: once to add a number to both values, and once to divide so that you arrive at the desired values (2118 at upper left, and 2006 at bottom right).
- If you are interested in math, read this step for some background. Otherwise, jump right to step 5 and calculate the results you need. To get both the brightest and dimmest pixels to the target values we desire, we need to add some value to both, and then divide both by some other number. The math for this transformation follows:
The formula for converting the existing brightest pixel to the desired brightness (assuming the brightest pixel is currently 3276) is:
Equation 1: (3276 + x)/y = 2118
where x is some value we need to add to all of the existing pixel values in the gradient, and y is some number that we need to divide by to get the desired result. The formula for converting the existing dimmest pixel (which is zero) to the desired level is:
(0 + x)/y = 2006
We can solve for Y as follows:
() + (x/y) = (3276 + x)/y
Multiplying each term by y gives us:
112y + x = 3276 + x
Subtracting x from each side of the equation:
112y = 3276
y = 3276/112
y = 29.25
The generalized formula for finding y, the number we want to divide by, is:
y = <current brightest pixel>/(desired brightest pixel> - <desired dimmest pixel>)
The number we are going to add (x) can now be calculated by dropping y into the original Equation 1:
(3276 + x)/29.25 = 2118
3276 + x = 2118 * 29.25
x = (2118 *
x = 58,675
Thus, if we add 58,675 to every pixel in the gradient, and then divide by 29.25, we will get a gradient with exactly the values we desire. In practice, it is much easier in Maxim DL to perform a subtraction, so divide 29.25 into 1 to get the value by which to multiply: 3.24%.
- To calculate y, the number to add to all pixel values, use this formula:
y = a/(b - c)
where a is the brightest value after Maxim DL step 2; b is the desired brightest value, and c is the desired dimmest value. For this example, this becomes 3276/() or 3276/112, which is 29.25. Now divide 1 by this number and multiple by 100 [(1/29.25) * 100] to get the value to be used for multiplication in pixel math: 3.42%.
- To calculate x, the number to add to all pixel values, use this formula:
x = (b * y) - a
where b is the desired brightest value, y is the result calculated in step 5 above, and a is the existing brightest value after Maxim DL step 2. For this example, this is (2118 * , or 61, which is 58,675.
- Now we plug these values into Maxim DL to perform the add operation, adding the same value to all pixels. Use pixel math, with the following values:
- Image A is set to the file you just opened
- Scale factor must be set to 100
- Operation should be set to none; there is no other file.
- Image B will be grayed out after step C above.
- Add constant must be set to the value of x (e.g., 58675).
- Click OK
- To perform the divide by y operation, use pixel math, with the following values:
- Image A is set to the file you just opened
- Scale factor should be set to the y value you calculated above, expressed as a value for multiplication (e.g., 1 divided by y, or 3.24)
- Operation should be set to none; there is no other file.
- Image B will be grayed out after step C above.
- Add constant must be set to zero.
- Click OK
- The result is a gradient which you can now subtract from your original image. Have two files open for this: the gradient you created using the steps above, and your original image. Using Process | Pixel Math, enter the following settings:
- Image A is set to your image file
- Scale factor must be set to 100
- Operation should be set to subtract
- Image B is set to your gradient file.
- Add constant must be set to zero.
- Click OK
This subtracts the gradient you created from the problem image, leaving you with a very flat background, and ready for additional processing. Remember that you should already have applied a regular flat field to the image, since this technique can only remove a linear gradient. It cannot help with a gradient that varies in two directions at once, which is typically the kind of problem that a flat field fixes very well.