Using invert and multiply to combine multiple images
You can download a set of ten images to try these techniques yourself. The tutorial below uses four images, but I later took ten even better images of the Bubble nebula, and they are even better-looking when combined than these are. The images are TIFF files in a ZIP file. You can load the TIFF images into Photoshop and try the techniques outlined here.
1. Export Images as TIFF Files
3. Invert the Image (Make It Negative)
4. Combine the Images One by One
5. Invert Again (Make It Positive)
1. Export Images as TIFF Files
![]()
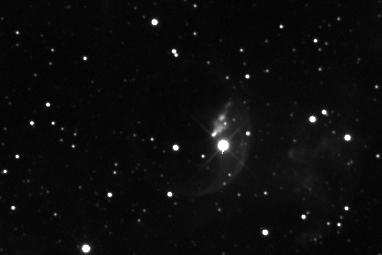
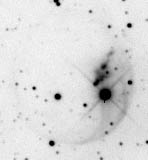
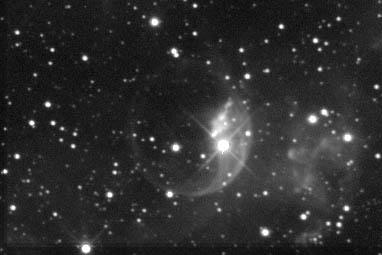
The image at left is one of four images of the Bubble Nebula, NGC 7635, that I took on September 1, 1999. The image shows some detail of the nebula visible, but the actual character of the nebula is not clear from this one image.
The other three images in the set also fail to show important details of the nebula. By combining the four images mathematically, we can tease out the subtle details. The data is there, but the light levels in the subtle details are so low, and spread across such a small range, they are not visible.
The exposures are 5 minutes each, taken with an SBIG ST-7E camera through a Takahashi Mewlon 210 telescope. All four exposures had dark frames and flat-field frames applied in Maxim/DL image processing software. In addition, I used the Maxim/DL Process | Align menu selection to align the four images before saving them as TIFF files.
To work with the files in Adobe Photoshop 5.0, I first had to export them in TIFF format from Maxim/DL. I exported them as 16-bit files. The image at left shows the appearance of the image when loaded into Photoshop. There is not much detail visible, because the image's data is all at the low end of the 65,000 possible values in a 16-bit image. This is typical of CCD images of faint objects.
Note that the brightest star shows slight blooming, in the form of vertical streaking. For optimal results, an exposure shorter than 300 seconds should have been used.
2. Adjust Levels in Photoshop
![]()
I used the Image | Adjust | Levels menu selection to adjust the contrast and gamma for each image. This is similar to the Back and Range settings in CCDOPS, and the Minimum and Maximum settings in Maxim/DL's Screen Stretch window. I set the Back/Minimum value to give me a reasonably dark sky background, and I set the Range/Maximum value so that no part of the nebula is burned out (that is, totally white).
These adjustments are made using the three sliding triangles below the histogram. The left triangle sets the minimum value, the right triangle sets the maximum value, and the middle triangle sets the gamma value. See my article on Getting the most out of globulars for some background on working with histograms.
If the image is so dark that you have moved the small triangles nearly all the way to the left and the image quality is still not what you want it to be, click OK, then reopen the same dialog box and adjust again. Repeat as many times as you need to.
When each image has appropriate levels with maximum detail visible, use the Image | Mode | 8 bits/channel menu selection to convert the image to 8-bits. This is necessary because Photoshop will not let you perform most functions on 16-bit images.
Once you have adjusted levels and gamma, you will have an image that shows as much detail as possible. However, for many objects, portions of the image will still be very subtle, perhaps not even visible at all. There may still be useful data present. You can tease out the subtler data by using multiplication.
Unlike addition, multiplication does not increase all pixels in the image equally. For example, if you add two images together, you will get approximately twice the brightness for any given pixel. For example, if a pixel has a value of 100 in the first image, and 108 in the second, it will have a value of 208 in the final image.
Multiplication is a much more powerful combination tool. However, by its nature, multiplication tends to make everything in an image whiter. If you simply combine images with multiplication, you will get an image that is burned out. If you invert the image before multiplying, the stars (and subtle nebular details) will be dark, and the sky background will be white. Multiplying images will now drive the background whiter and whiter, while image details are less affected. This process tends to enhance details that are only slightly brighter than the background brightness.
3. Invert the Image (Make It Negative)
![]()
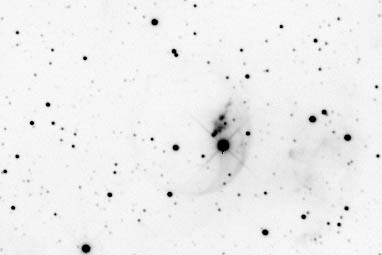
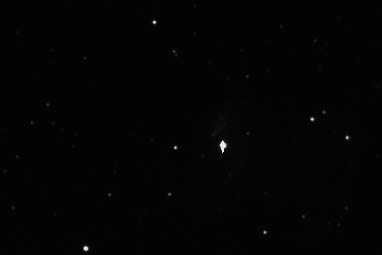
The image at left shows a negative of the original image at the top of this page. To invert an image, use the Image | Adjust | Invert menu selection.
There isn't really any additional detail visible at this point. I opened each of the four images and adjusted levels, and inverted them, and then left just the four inverted images open in Photoshop. The only function of the Invert operation is to make sure that the multiplication to come will have the desired effect.
4. Combine the Images One by One
![]()
You can combine images in Photoshop with the Image | Apply Image menu selection. This opens the dialog shown at left. By default, the Source will be the current image. This would cause the current image to be multiplied by itself. Click the small arrow at the right of the Source drop-down box, and select one of the other images in the set.
Verify that the Preview box is checked, so that you can see the effect of the multiplication in the image window.
Verify that the Blending method is set to Multiply. If you are curious, select some of the other blending methods to see what they look like.
In order to control the degree of impact that multiplication has on the areas of the image that we are most interested in enhancing, click to check the Mask checkbox. This expands the dialog box, as shown at left. The Mask is an image that will be used to constrain where, and to what degree, the multiplication takes effect. This should be the exact same image you selected as the Source earlier.
By using the applied image to mask itself, you are making sure that the multiplication will enhance subtle details. Bright stars and other prominent features will not become overemphasized.
For some situations, or if you prefer the way it looks, experiment with leaving the mask out. You will see some overexposure in brighter areas, but you may like the results you get in other portions of the image. Try both ways so you know how each works.

The three images at left show the progressive enhancement of subtle detail in the nebula as each successive multiplication occurs. Remember to change both the Source and the Mask to be the same file each time you perform a new multiplication!
5. Invert Again (Make It Positive)
![]()
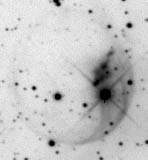
To turn the image back into a positive, use the Image | Adjust | Invert menu selection. The result is shown at left. Subtle image details are now much more clearly visible.
You can use the Image | Adjust | Levels menu selection to properly balance contrast and gamma once again.
At left you can see the histogram for the image above. Notice that the curve has been broadened in the darker areas where most of the image data exists. This broadening was achieved by inverting and multiplying. The histogram shows graphically what the eye sees automatically: the portion of the image with subtle detail now spreads over a wider range of values, which enhances contrast and makes more of the subtle details visible.
Further image enhancements, such as unsharp masking, can now be undertaken to bring out additional details.
![]() Invert and multiply is just one of many
techniques you can use to probe for hidden detail in your CCD images. I'll
be providing information about other techniques in the near future.
Invert and multiply is just one of many
techniques you can use to probe for hidden detail in your CCD images. I'll
be providing information about other techniques in the near future.