Celestron Fastar for CCD Imaging
The short version of this review is simple: The Fastar makes a very good CCD imaging tool. I was able to take some very nice shots with it. It has some limitations, but since it costs a fraction of most other entry-level setups, that's not a very big issue.
| Image quality | Image quality was excellent. The 8" aperture of the C8, and the small pixels of the ST-237 combine to give great results; the pictures in this review speak for themselves. |
| Ease of use | I was up and using the system in less than ten minutes total. Operations couldn't be simpler, and the camera works with either the supplied CCDOPS, or other camera control software such as my favorite, Maxim/DL. You do need to pay attention to the camera sticking out of the front of the tube (it's supported by the corrector plate). |
| Plus |
|
| Minus |
|
The test configuration: C8 OTA (from a G8 kit) with Fastar lens assembly and an ST-237 camera with color filter wheel. Mount used for testing was a Vixen GP-DX (see review).
The ST-237 is very small, but it still has room for an internal color filter wheel for RGB exposures. For this image, I took four images in each color (red, blue, and green) and then "median combined" each set of four images in Maxim/DL. In a median combine, the software calculates the median value of each pixel. This is better than an average combine, because extreme values (such as cosmic ray hits) get factored out in a median combine. The more extreme the value, the more images you should have to get the best result.
Final image tweaks were done in Photoshop 5.5. This included darkening the background using the Color Range feature, and adjusting levels before saving a JPG version of the image.
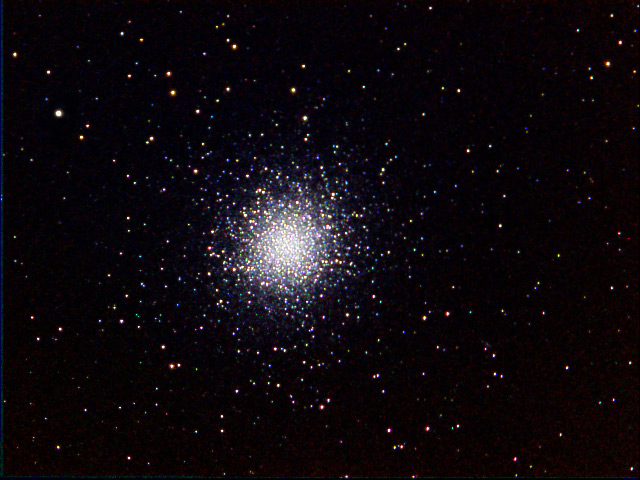
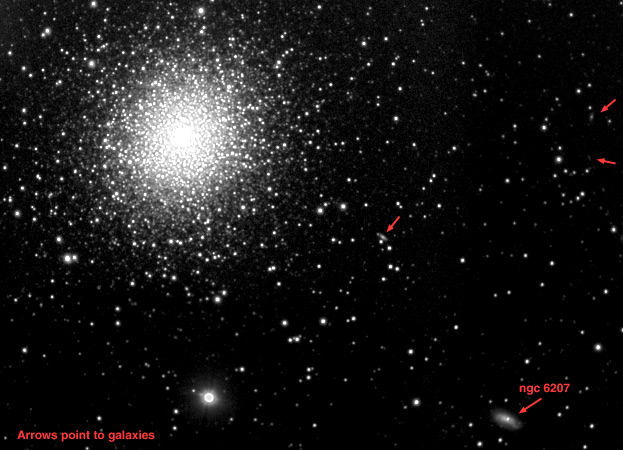
M13
RGB Combine: 4 60-second images in each color
Click on an image to see a larger version.
It was the last object I imaged, about
3:30am. The moon was well up, and the moisture content was very high (fog
was starting to form). So I had a lot of sky glow to deal with, and the flat
fields that I had
taken earlier in the night were not as effective; there was a general
brightening in the upper left of the Cocoon images that was not
completely dealt with by my flats.
I took a total of 20 unguided images of the nebula, each 60 seconds. I median combined the images in groups of four in Maxim/DL. I then tried two approaches: I summed the five groups, and I median combined the five groups. I then applied Digital Development to each to see if there was any difference.
The summed images looked harsh, while the median combined images looked much smoother, so I went with the 20 median-combined images for further processing. The background was very unevenly illuminated, and It took quite a bit of trial and error in Photoshop to come up with an approach that would fix the problem. See the next image for the result of the Maxim/DL processing, and you will see why I felt I needed to find a way to save the image.
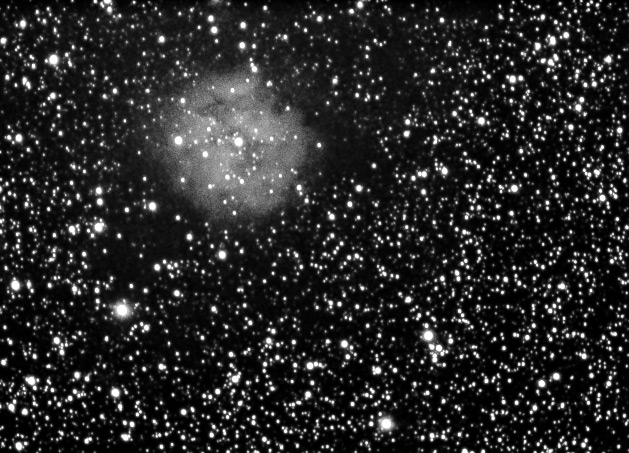
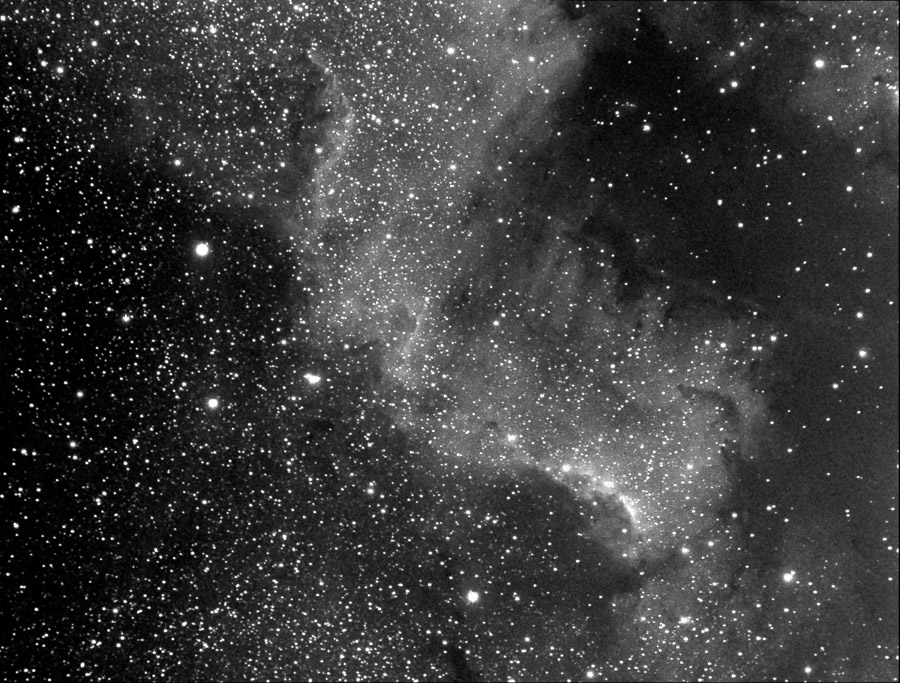
Cocoon Nebula
20 60-second images median combined in Maxim/DL
I feathered the selection by one pixel to avoid harsh edges. Then I used Adjust | Levels to apply a gamma correction to the selection, darkening it. I then applied a very, very tiny Gaussian blur to the selection, which removed the pixelation effect you get in noisy areas of the image. I then went back to Color Range, and selected just the nebula (not the stars in the nebula, just the nebulosity), and applied a very, very gentle unsharp mask.
The net result of the manipulations in Photoshop was to remove the sky glow, and to draw the nebula details out a little more into the foreground, as shown in the previous image.
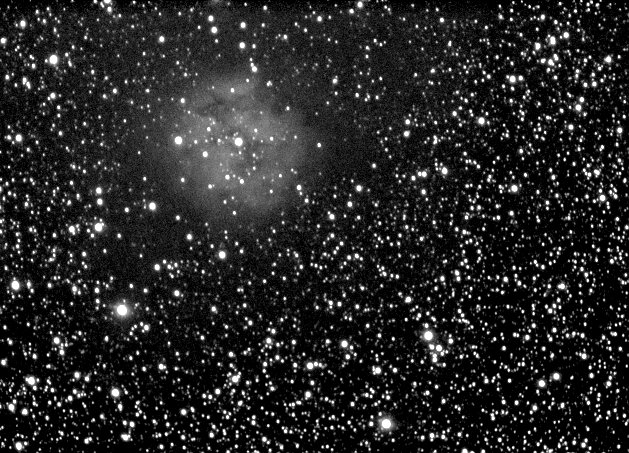
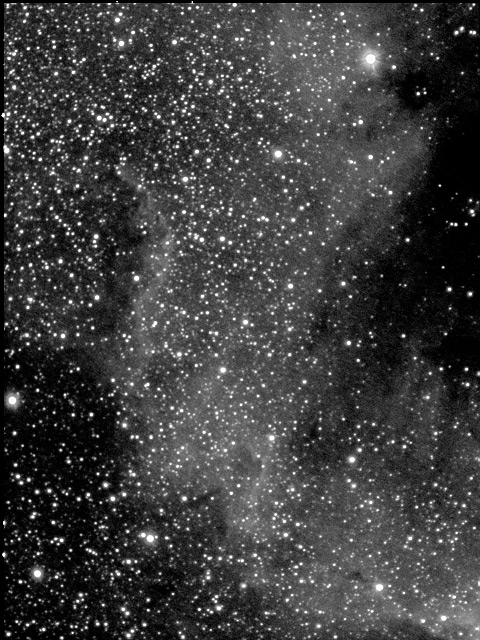
Cocoon Nebula
Same as above, but prior to Photoshop fixes
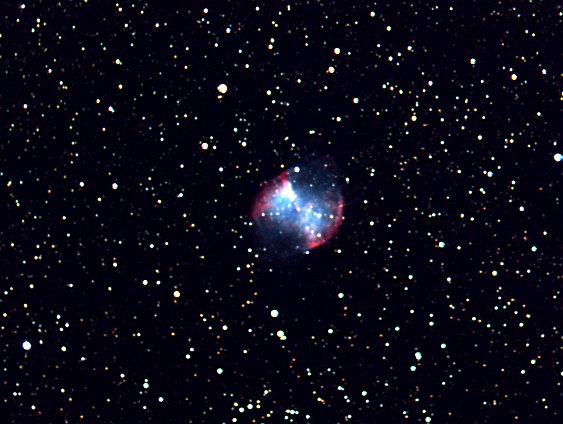
M27, the Dumbbell Nebula
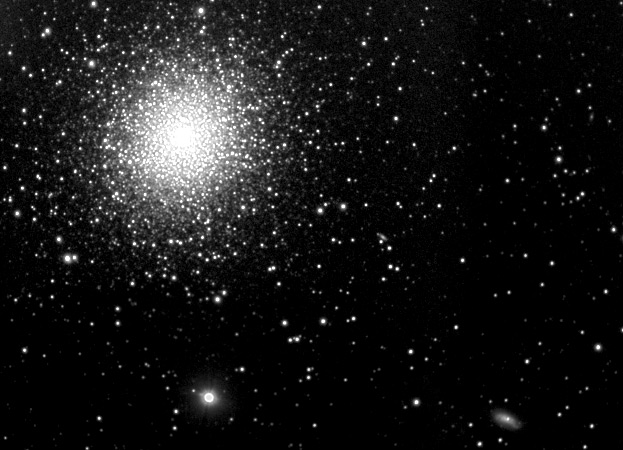
M13 and Company
Can you find the four galaxies in the full version of this image?
The Traveler image has somewhat better contrast, but more glare from stars. The Traveler image was taken with an ST-8E camera, which has larger pixels (9 microns versus 6.8 in the ST-237) and a lot more pixels (1530x1020 versus 640x480).
Speaking of the ST-237 -- it may have fewer pixels than the ST-8, but it's still large enough to do interesting, useful imaging.
"Mexico" portion of the North American Nebula
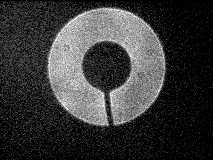
The vignetting looks somewhat severe in the image at right, but the software tends to exagerate the vignetting. It is only a few percent difference in illumination from center to edge.
Flat field image, showing minor vignetting
The camera is larger than the original secondary, so there is more secondary obstruction that you start with. However, the proof is in the pudding, and the images look good. It is generally true that a camera can tolerate a large secondary better than the human eye, and the Fastar demonstrate the truth of that statement. A large secondary robs the visual image of contrast, but when you are imaging, you can use the image processing software to adjust the contrast to a reasonable level.
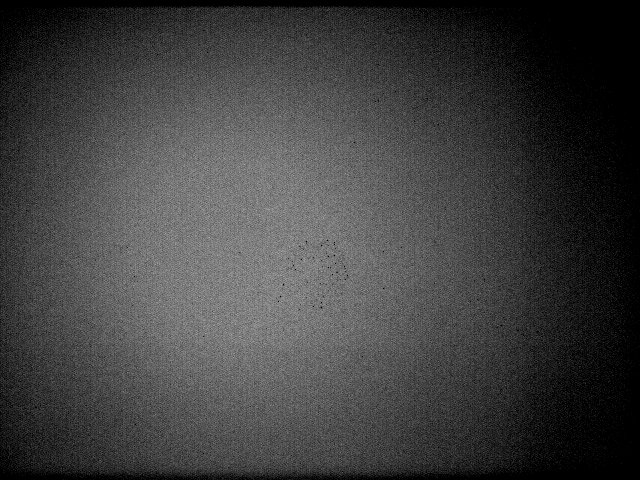
Out of focus star image, showing shadow of camera and cable
The Fastar lens assembly is a thick-walled, sturdy tube that replaces the C8's secondary mirror. It contains one or more lenses (I can't tell for sure) that help correct the aberrations of the very fast focal ratio primary mirror. There were some early experiments with placing a camera at the focus of the primary mirror, but the field was not flat enough, nor well-corrected enough. The lens in the Fastar assembly takes care of these problems. As you can see from the image above, the lens assembly does an excellent job of correction!
To use the Fastar, you must do the following:
- Remove the secondary mirror
- Store it in a holder provided with the Fastar kit
- Install the Fastar in place of the secondary
- Attach the camera, and GO!
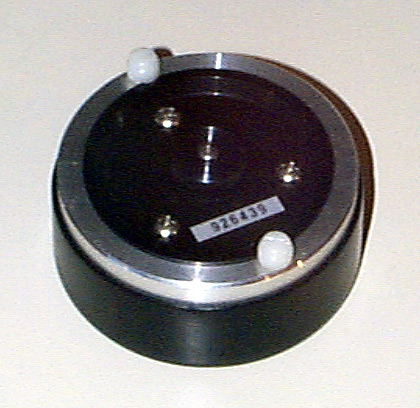
The secondary mirror has a small ridge on it that fits into a groove in the ring that remains on the corrector place. You can see this ring at right, in an image that shows the appearance of the C8 after the secondary has been removed.
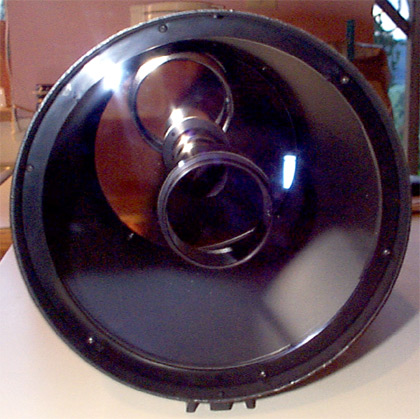
The secondary has been removed from the corrector plate.
Click on an image to see a larger version.
The secondary mirror hangs down into the holder, suspended above the plastic dust cover, and is secured in place by the two small white plastic screws on the right side of the image at right.
The retaining ring is also shown in the image at right, but for no good reason; I guess I just left it sitting there!
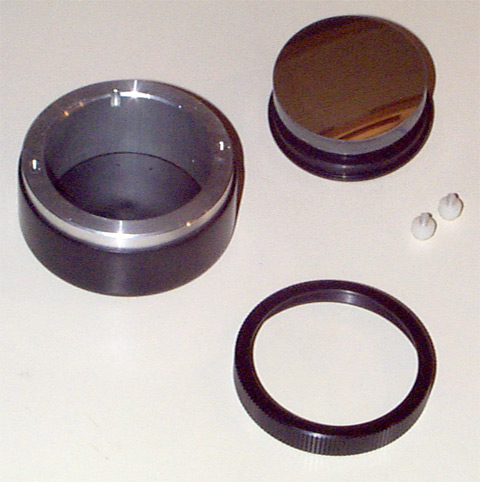
The secondary (upper right), the secondary holder (left), and the retaining ring (lower right).
The secondary is held in place by two plastic screws.
If you are using the Fastar on an equatorial mount, as I did and as I recommend for best results, you won't need the counterweight.
The Fastar lens assembly is shown at far right. The base fits exactly in the hole in the corrector plate, and you use the retaining ring, shown at bottom (a bit of a scene stealer, isn't it?) to secure the lens assembly. There are two small screws at the top of the lens assembly. These are tightened down to hold the camera in place.
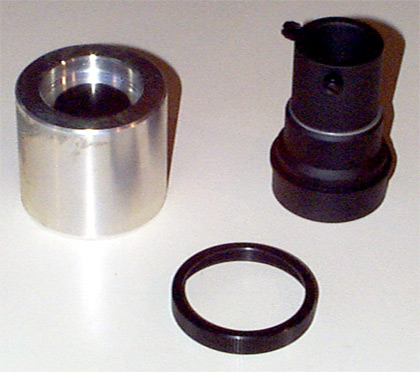
The counterweight (left), Fastar lens assembly (right), and the retaining ring that formerly held the secondary mirror.
At this point, the whole thing doesn't look too unusual; the Fastar assembly isn't all that much larger than the secondary was.
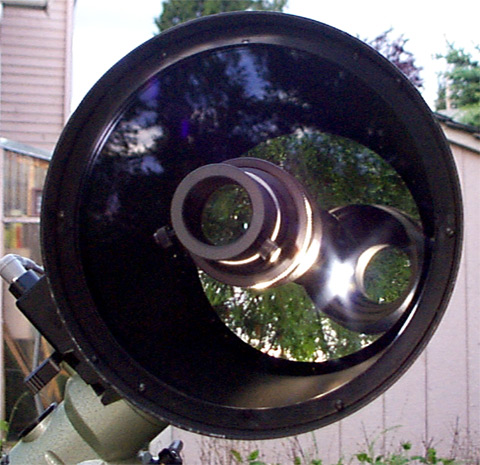
The Fastar lens assembly in in place on the corrector plate.
Despite the ungainly appearance, the contraption works very effectively. The wide field, high image quality, and easy setup won me over.
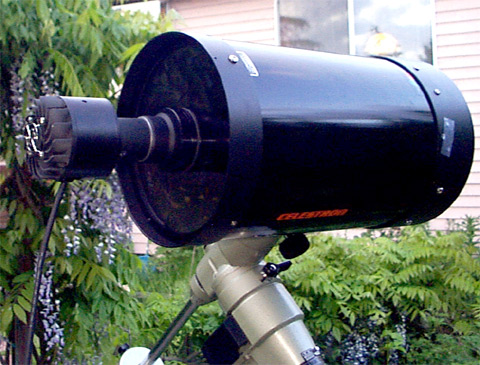
The camera is inserted into the Fastar lens assembly.
Visit Mike Chapa's site. He's a USAF Test Pilot (currently F-16's) doing some excellent imaging with the Fastar setup.
The link is to the San Francisco Amateur Astromer's member images page. Click on images with Robert's name to see what's he's accomplished with the Fastar.
Mark H's page features a multitude of images taken with the ST-237. He uses the camera in Fastar mode and with various other combinations, so it's a great place to get a feel for the wide variety of configurations available with the camera/scope combination.
Ray's site features a large number of excellent, high-quality Fastar images.